
Commemorating 19 Years of Closet Cooking
**Honoring 19 Years of Closet Cooking: A Tale of Taste and Imagination**
Closet Cooking, an adored culinary blog, celebrates its 19th year of bringing joy to food lovers with an abundance of scrumptious recipes and cooking inspiration. In almost two decades, Closet Cooking has established itself as a trusted reference for home chefs in search of creative and appetizing meals.
Looking back on the previous year, Closet Cooking has once again provided a varied selection of recipes that appeal to diverse tastes and preferences. From substantial main courses to delightful side dishes, the blog has served a feast of culinary wonders. Appetizers, desserts, breakfasts, soups, sandwiches, pastas, and breads have all made appearances in the blog’s vast collection, highlighting flavors from different international cuisines.
The last year has been especially thrilling, featuring new recipes that have won the hearts and taste buds of its audience. The blog’s creator has shown excitement for the culinary journeys that await, keen to investigate and share even more inventive recipes in the upcoming year.
Below are some of the standout recipes from the past year that have become favorites among Closet Cooking’s supporters:
1. **Spicy Korean Beef Tacos**: A blend of Korean and Mexican tastes, these tacos include tender beef infused with a spicy marinade, crowned with fresh veggies and a zesty slaw.
2. **Lemon Blueberry Cheesecake Bars**: A dessert that perfectly balances sweetness and tartness, uniting the classic flavors of lemon and blueberry in a smooth cheesecake bar.
3. **Creamy Tuscan Chicken Pasta**: A heartwarming dish featuring juicy chicken, sun-dried tomatoes, and spinach in a decadent, creamy sauce served over pasta.
4. **Thai Peanut Salad**: An invigorating salad with crunchy vegetables, dressed in a savory and mildly spicy peanut sauce.
5. **Sourdough Bread**: A homemade bread recipe that has become essential for many, delivering an ideal combination of a crispy crust and a soft, chewy texture.
As Closet Cooking commemorates this achievement, it continues to motivate and empower home cooks to experiment with novel flavors and techniques. With a dedication to sharing delightful food and recipes, the blog remains a beloved asset for culinary enthusiasts globally. Here’s to another year filled with tasty discoveries and culinary imagination!
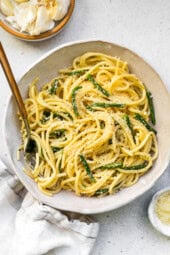
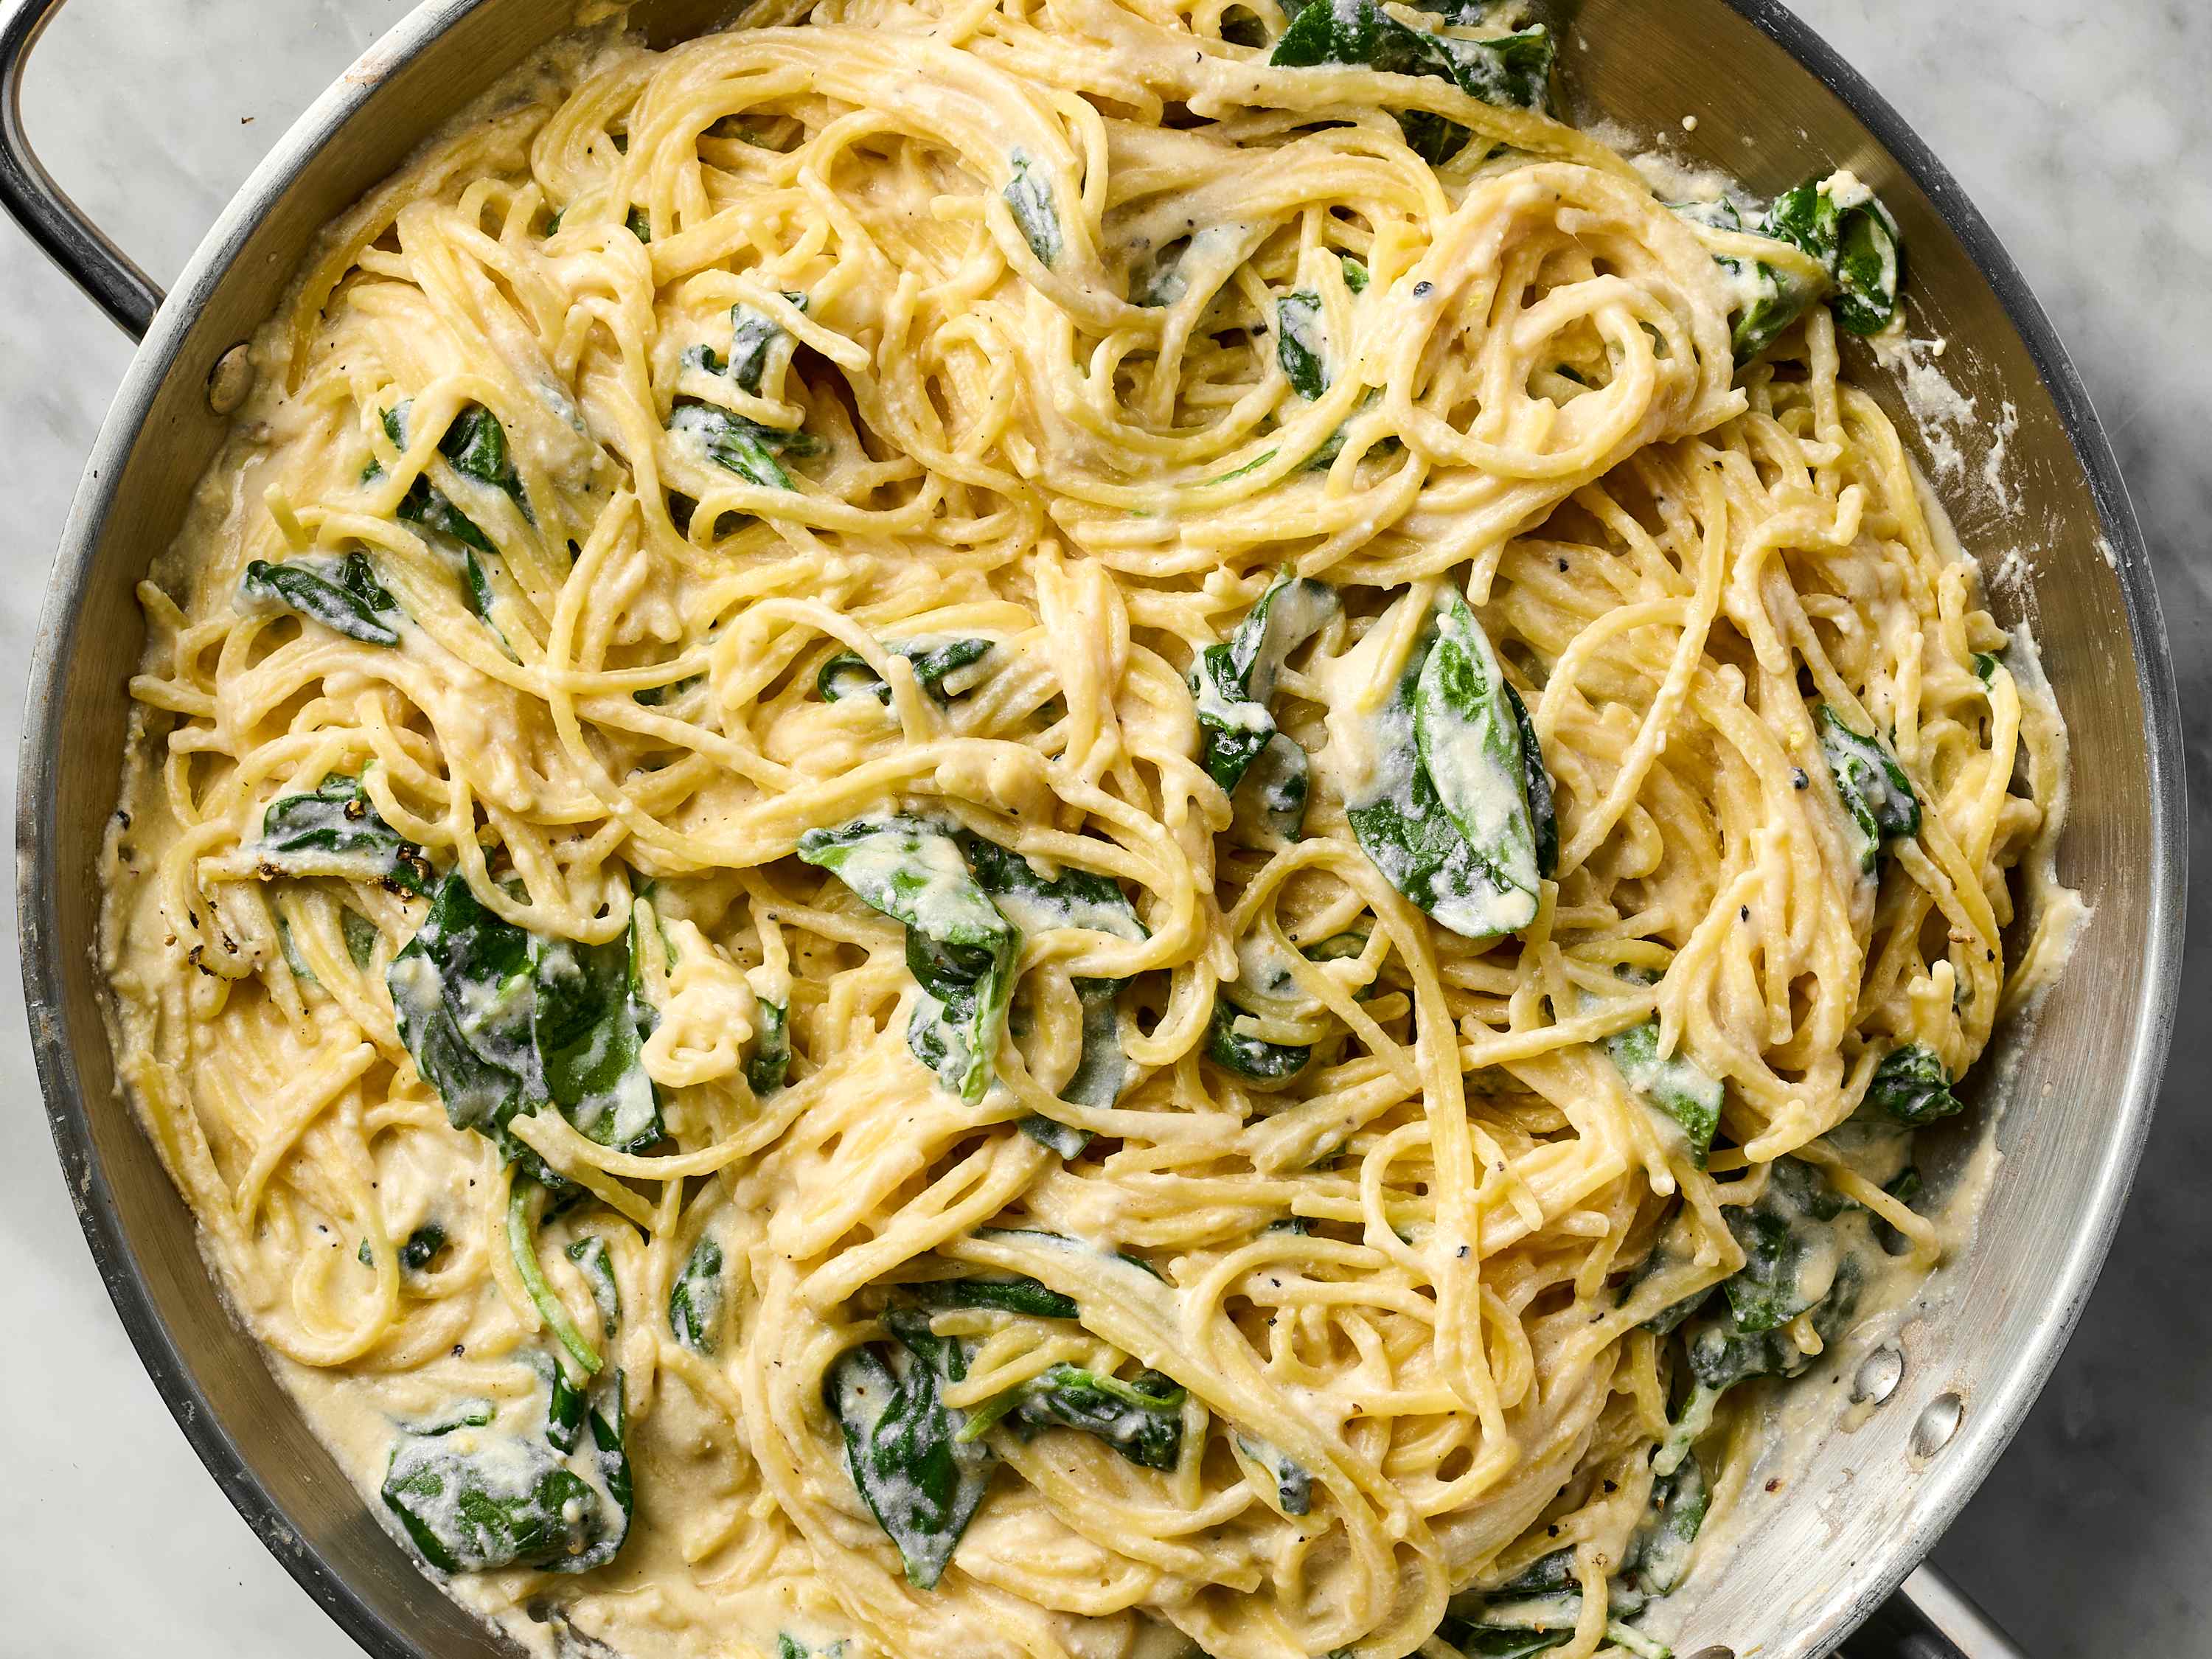
Asparagus-Enhanced Pasta Recipe
**Title: Enhance Your Culinary Journey with Asparagus-Infused Pasta**
Asparagus, a highly adaptable and nutritionally dense vegetable, has historically been praised for its distinct taste and health advantages. When paired with pasta, it results in a delightful meal that is both fulfilling and healthy. This article delves into the technique of making an asparagus-infused pasta dish, showcasing its components, cooking methods, and the health perks it provides.
**Ingredients:**
To whip up a tasty asparagus-infused pasta dish, gather the following ingredients:
– 1 pound of fresh asparagus
– 12 ounces of your preferred pasta (like fettuccine, linguine, or penne)
– 2 tablespoons of olive oil
– 3 cloves of garlic, minced
– 1/2 cup of grated Parmesan cheese
– 1/4 cup of heavy cream or a dairy-free substitute
– Zest of one lemon
– Salt and pepper to taste
– Optional: Fresh basil or parsley for garnish
**Preparation:**
1. **Prepare the Asparagus:**
Start by thoroughly washing the asparagus. Trim the tough ends and chop the spears into bite-sized pieces, roughly 1-2 inches long.
2. **Cook the Pasta:**
In a large pot, bring salted water to a boil. Add the pasta and cook according to the package directions until al dente. Save 1 cup of pasta water, then drain the pasta and set it aside.
3. **Sauté the Asparagus:**
In a large skillet, warm the olive oil over medium heat. Add the minced garlic and sauté for around 1 minute until aromatic. Mix in the asparagus pieces and cook for 4-5 minutes until they become tender-crisp and bright green.
4. **Combine Ingredients:**
Lower the heat and incorporate the cooked pasta into the skillet with the asparagus. Add the heavy cream and a splash of the reserved pasta water to form a light sauce. Stir in the Parmesan cheese and lemon zest, mixing thoroughly to coat the pasta uniformly. Season with salt and pepper to taste.
5. **Serve:**
Dish out the asparagus-infused pasta onto serving plates. Garnish with fresh basil or parsley if desired. Serve immediately, savoring the blend of flavors and textures.
**Health Benefits:**
Asparagus is a nutritional powerhouse, with a host of health advantages. It is packed with vitamins A, C, E, and K, along with folate and fiber. Asparagus is also recognized for its antioxidant features, which help safeguard cells from oxidative damage. When paired with pasta, this dish offers a balanced meal that is both nourishing and appetizing.
**Conclusion:**
An asparagus-infused pasta dish is a delightful method to bring more vegetables into your diet while relishing a comforting meal. Its straightforward preparation and rich flavors make it an excellent choice for both weekday dinners and special events. By following the steps outlined above, you can whip up a dish that is not only pleasing to the taste buds but also advantageous for your health. So, gather your ingredients and set off on a culinary adventure that honors the vibrant flavor of asparagus.

Cucumber Salad with Vinegar Dressing
This cucumber salad featuring vinegar is a simple, wholesome side dish crafted from thinly cut cucumbers and onions in a zesty brine: prepared in just minutes and even more delicious the following day!
Did you have the custom of enjoying cucumber salad while growing up? This vinegar-based cucumber salad embodies summer (and it’s something I relished during my childhood, so it evokes nostalgia for me). It’s ideal for occasions such as summer potlucks, patio barbecues, and picnics, and complements a variety of dishes from salmon to grilled burgers.
Here’s a variation of my family recipe: the cucumbers and onions, sliced thinly, offer a salty, tangy, and mildly sweet flavor simultaneously, making it utterly irresistible. This cucumber salad is vegan, plant-based, and gluten-free, making it suitable for a range of dietary preferences!
5 Star Reader Review
⭐⭐⭐⭐⭐ “This salad is fantastic! Ever since I found it, I’ve already made it twice!! I truly appreciated how the onions were sliced so thin that they didn’t overshadow the dish. My husband also enjoyed it!” -Anonymous
Ingredients You’ll Need
You only need a handful of ingredients to create this cucumber salad with vinegar (for specific amounts, see the recipe below):
Cucumbers: If possible, opt for English cucumbers. They boast a sweet taste, delicate skin, and virtually seedless structures. Standard cucumbers are also acceptable, but we suggest English cucumbers if available (sometimes referred to as Persian cucumbers).
White onion: The subtle flavor of white onion is essential for this recipe. Feel free to mix white onion with red onion as we do in our traditional cucumber salad.
Fresh dill: I’ve included fresh dill for an herby touch. However, it’s not mandatory: preparing the salad without it still results in a wonderful taste. You may also use dried dill if preferred.
White vinegar, sugar, and kosher salt: These elements come together to create a tangy brine for the salad.
How to Make Cucumber Salad with Vinegar
This cucumber salad with vinegar is remarkably simple to prepare: the only challenging part is being patient while it marinates in the fridge! The secret to perfecting this cucumber salad is to slice the onions and cucumbers as thinly as you can. Thinly slicing the cucumbers and onions allows the salt to extract most of the moisture, giving this salad an astonishingly delightful texture.
After marinating for 1 hour, you can enjoy your cucumber salad with vinegar any time within the next 7 days. The flavor continues to improve over time!
What to Serve with Vinegar Cucumber Salad
There are numerous ways to enhance this cucumber salad with vinegar! We typically enjoy it as a refreshing summer side dish, so naturally, it pairs well with meals abundant in summer vegetables. However, this salad can be enjoyed year-round. Here are some ideas to inspire you:
Summer Grill Night:
Easy Picnic Spread:
Storage
Keep refrigerated in a sealed container for up to 7 days. The liquid will collect: this is normal! Stir well before serving and use a slotted spoon.
Dietary Notes
This cucumber salad featuring vinegar is vegetarian, gluten-free, vegan, plant-based, and dairy-free.
Frequently Asked Questions
Can I prepare this salad in advance? Absolutely! The flavors will blend and develop over time, enhancing its taste.
How long will cucumber salad remain fresh in the refrigerator? Stored in an airtight container, cucumber salad can last for 7 days in the fridge. The cucumbers may soften slightly with time.
What type of vinegar is best for cucumber salad? White distilled vinegar is a traditional option. We recommend using it whenever possible.
Can I use a different type of cucumber? English cucumbers are optimal for their thin skin and fewer seeds, but regular cucumbers are fine too. Just peel them if the skin is thick or coated with wax.
Cucumber Salad with Vinegar
This cucumber salad featuring vinegar is a simple, wholesome side dish crafted from thinly cut cucumbers and onions in a zesty brine: prepared in just minutes and even more delicious the following day!
Author: Sonja Overhiser
Prep Time: 1 hour 10 minutes
Cook Time: 0 minutes
Total Time: 1 hour 10 minutes
Yield: 6 to 8
Category: Salad
Method: Raw
Cuisine: German
Ingredients
2 large, thin cucumbers (English if possible)
1 small yellow or white onion
2 tablespoons chopped fresh dill (optional)*
½ cup white vinegar
2 tablespoons granulated sugar
1 teaspoon kosher salt
Fresh ground black pepper
Instructions
Slice the cucumbers as thin as you can, using a mandolin if you wish. Peel and thinly slice the onion into half-moon shapes. Arrange the cucumbers and onions in a large shallow bowl; add the dill (if using). In a small bowl, combine the white vinegar, sugar, salt, and
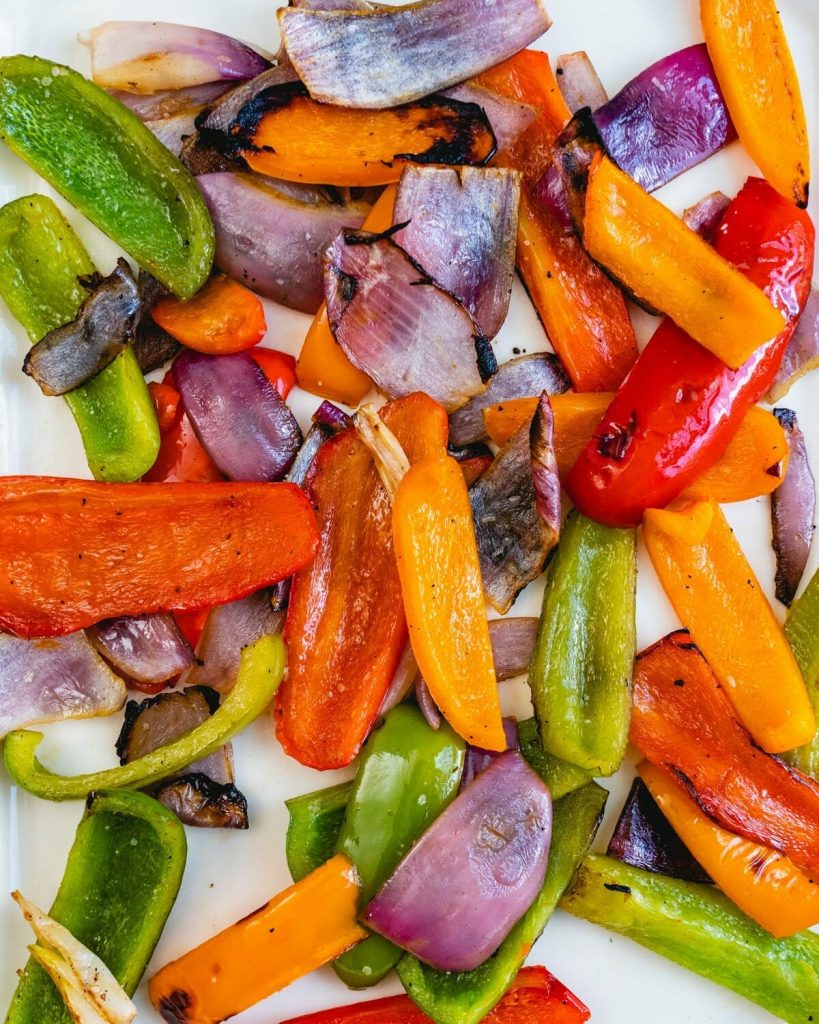
How to Perfectly Grill Peppers and Onions
Alex & Sonja: The Culinary Pair Behind A Couple Cooks
Introducing Alex and Sonja Overhiser, the energetic pair who have transformed their love for cooking into a flourishing online community. As the authors of two celebrated cookbooks and the creators of the well-known website, A Couple Cooks, Alex and Sonja have been motivating home cooks since 2010 with their straightforward, seasonal recipes and infectious passion for the culinary arts.
Their adventure into the realm of food blogging started as a mutual pastime. As busy parents and a couple in real life, Alex and Sonja discovered joy in cooking together and aimed to share that experience with others. Their website, A Couple Cooks, swiftly evolved into a hub where they could present thousands of original recipes, cooking advice, and meal planning concepts, all thoughtfully crafted and photographed by the duo themselves.
What distinguishes Alex and Sonja is their dedication to crafting recipes that are not only tasty but also within reach for the everyday cook. Their emphasis on seasonal ingredients guarantees that their dishes are fresh and flavorful, while their clear instructions make them simple to follow. Whether you’re a beginner in the kitchen or an experienced chef, A Couple Cooks has something for everyone.
Besides their website, Alex and Sonja have penned two cookbooks that further highlight their culinary skills and inventiveness. These books reflect their commitment to helping others discover joy in cooking, with each recipe tested and approved by their own family, including their children.
Through A Couple Cooks, Alex and Sonja have cultivated a community of food enthusiasts who share their passion for cooking and enjoying good food. Their accessible style and genuine affection for their craft have made them cherished figures in the food blogging community, and their work continues to inspire numerous individuals to embrace the pleasure of cooking.
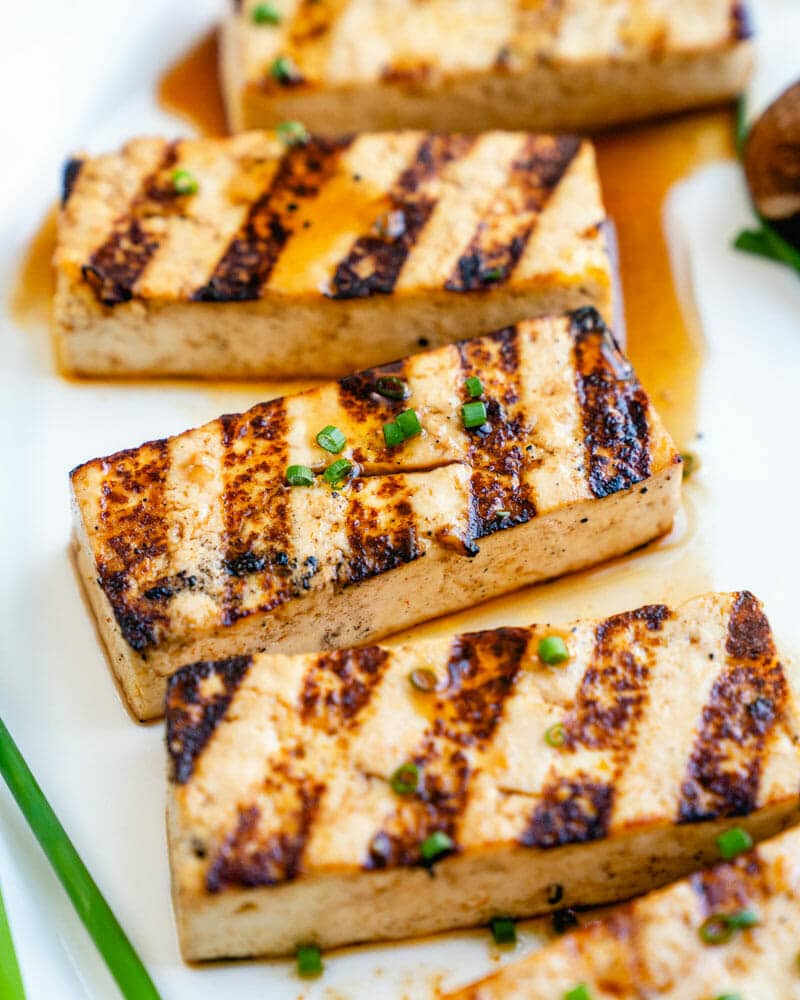
Easy and Fast Grilled Tofu Recipe
**Grilling Tofu: A Guide to Perfectly Grilled Tofu with Mediterranean Flavors**
Tofu is an adaptable and healthy plant-derived protein that can enhance any dish. When grilling tofu, selecting the appropriate kind is vital for optimal outcome. Soft or silken tofu should be avoided for grilling, as it does not possess the density required to withstand grilling. Instead, choose firm or extra-firm tofu, which will retain its shape and texture when exposed to high temperatures.
**Preparing Tofu for the Grill**
1. **Press the Tofu:** Start by pressing the tofu to eliminate excess moisture. This step is crucial for achieving a denser texture and enabling the tofu to soak up marinades more effectively. Place the tofu block between paper towels or a clean kitchen towel and place a heavy item on top, such as a cast-iron skillet or a stack of books. Allow it to sit for at least 30 minutes.
2. **Slice the Tofu:** After pressing, cut the tofu into uniform pieces. Thicker slices are preferred for grilling since they are less likely to break apart.
3. **Marinate the Tofu:** To impart flavor to the tofu, marinate it prior to grilling. For a Mediterranean-inspired twist, use this marinade:
– 6 tablespoons soy sauce
– ¼ cup olive oil
– 1 teaspoon garlic powder
– 1 teaspoon onion powder
– 1 teaspoon smoked paprika
Mix the ingredients in a bowl or a resealable plastic bag, add the tofu slices, and allow them to marinate for at least 30 minutes. For more pronounced flavor, marinate for several hours or overnight in the fridge.
**Grilling Tofu**
1. **Preheat the Grill:** Heat your grill to medium-high. Ensure that the grates are clean and lightly greased to avoid sticking.
2. **Grill the Tofu:** Position the marinated tofu slices on the grill. Cook them for about 4-5 minutes on each side, or until grill marks form and the tofu is heated throughout. Minimize movement of the tofu to prevent it from crumbling.
3. **Serve and Enjoy:** After grilling, take the tofu off the grill and serve it warm. Grilled tofu can be enjoyed on its own, added to salads, or paired with a side of grilled vegetables for a complete meal.
**Conclusion**
Grilling tofu is a straightforward yet fulfilling process that can enhance your plant-based meals. By selecting the right tofu and utilizing a flavorful marinade, such as the Mediterranean-style version, you can craft a scrumptious and gratifying dish. Remember to press the tofu, marinate it adequately, and grill it to perfection for the best results. Savor the smoky, savory notes of grilled tofu as a delightful complement to your cooking repertoire.

Commemorating 19 Years of Closet Cooking
**Honoring 19 Years of Closet Cooking: A Tale of Taste and Imagination**
Closet Cooking, an adored culinary blog, celebrates its 19th year of bringing joy to food lovers with an abundance of scrumptious recipes and cooking inspiration. In almost two decades, Closet Cooking has established itself as a trusted reference for home chefs in search of creative and appetizing meals.
Looking back on the previous year, Closet Cooking has once again provided a varied selection of recipes that appeal to diverse tastes and preferences. From substantial main courses to delightful side dishes, the blog has served a feast of culinary wonders. Appetizers, desserts, breakfasts, soups, sandwiches, pastas, and breads have all made appearances in the blog’s vast collection, highlighting flavors from different international cuisines.
The last year has been especially thrilling, featuring new recipes that have won the hearts and taste buds of its audience. The blog’s creator has shown excitement for the culinary journeys that await, keen to investigate and share even more inventive recipes in the upcoming year.
Below are some of the standout recipes from the past year that have become favorites among Closet Cooking’s supporters:
1. **Spicy Korean Beef Tacos**: A blend of Korean and Mexican tastes, these tacos include tender beef infused with a spicy marinade, crowned with fresh veggies and a zesty slaw.
2. **Lemon Blueberry Cheesecake Bars**: A dessert that perfectly balances sweetness and tartness, uniting the classic flavors of lemon and blueberry in a smooth cheesecake bar.
3. **Creamy Tuscan Chicken Pasta**: A heartwarming dish featuring juicy chicken, sun-dried tomatoes, and spinach in a decadent, creamy sauce served over pasta.
4. **Thai Peanut Salad**: An invigorating salad with crunchy vegetables, dressed in a savory and mildly spicy peanut sauce.
5. **Sourdough Bread**: A homemade bread recipe that has become essential for many, delivering an ideal combination of a crispy crust and a soft, chewy texture.
As Closet Cooking commemorates this achievement, it continues to motivate and empower home cooks to experiment with novel flavors and techniques. With a dedication to sharing delightful food and recipes, the blog remains a beloved asset for culinary enthusiasts globally. Here’s to another year filled with tasty discoveries and culinary imagination!
Read More Asparagus-Enhanced Pasta Recipe
**Title: Enhance Your Culinary Journey with Asparagus-Infused Pasta**
Asparagus, a highly adaptable and nutritionally dense vegetable, has historically been praised for its distinct taste and health advantages. When paired with pasta, it results in a delightful meal that is both fulfilling and healthy. This article delves into the technique of making an asparagus-infused pasta dish, showcasing its components, cooking methods, and the health perks it provides.
**Ingredients:**
To whip up a tasty asparagus-infused pasta dish, gather the following ingredients:
– 1 pound of fresh asparagus
– 12 ounces of your preferred pasta (like fettuccine, linguine, or penne)
– 2 tablespoons of olive oil
– 3 cloves of garlic, minced
– 1/2 cup of grated Parmesan cheese
– 1/4 cup of heavy cream or a dairy-free substitute
– Zest of one lemon
– Salt and pepper to taste
– Optional: Fresh basil or parsley for garnish
**Preparation:**
1. **Prepare the Asparagus:**
Start by thoroughly washing the asparagus. Trim the tough ends and chop the spears into bite-sized pieces, roughly 1-2 inches long.
2. **Cook the Pasta:**
In a large pot, bring salted water to a boil. Add the pasta and cook according to the package directions until al dente. Save 1 cup of pasta water, then drain the pasta and set it aside.
3. **Sauté the Asparagus:**
In a large skillet, warm the olive oil over medium heat. Add the minced garlic and sauté for around 1 minute until aromatic. Mix in the asparagus pieces and cook for 4-5 minutes until they become tender-crisp and bright green.
4. **Combine Ingredients:**
Lower the heat and incorporate the cooked pasta into the skillet with the asparagus. Add the heavy cream and a splash of the reserved pasta water to form a light sauce. Stir in the Parmesan cheese and lemon zest, mixing thoroughly to coat the pasta uniformly. Season with salt and pepper to taste.
5. **Serve:**
Dish out the asparagus-infused pasta onto serving plates. Garnish with fresh basil or parsley if desired. Serve immediately, savoring the blend of flavors and textures.
**Health Benefits:**
Asparagus is a nutritional powerhouse, with a host of health advantages. It is packed with vitamins A, C, E, and K, along with folate and fiber. Asparagus is also recognized for its antioxidant features, which help safeguard cells from oxidative damage. When paired with pasta, this dish offers a balanced meal that is both nourishing and appetizing.
**Conclusion:**
An asparagus-infused pasta dish is a delightful method to bring more vegetables into your diet while relishing a comforting meal. Its straightforward preparation and rich flavors make it an excellent choice for both weekday dinners and special events. By following the steps outlined above, you can whip up a dish that is not only pleasing to the taste buds but also advantageous for your health. So, gather your ingredients and set off on a culinary adventure that honors the vibrant flavor of asparagus.
Read More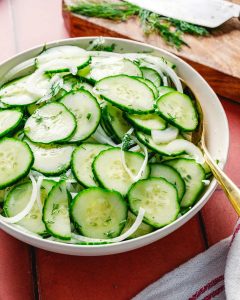
Cucumber Salad with Vinegar Dressing
This cucumber salad featuring vinegar is a simple, wholesome side dish crafted from thinly cut cucumbers and onions in a zesty brine: prepared in just minutes and even more delicious the following day!
Did you have the custom of enjoying cucumber salad while growing up? This vinegar-based cucumber salad embodies summer (and it’s something I relished during my childhood, so it evokes nostalgia for me). It’s ideal for occasions such as summer potlucks, patio barbecues, and picnics, and complements a variety of dishes from salmon to grilled burgers.
Here’s a variation of my family recipe: the cucumbers and onions, sliced thinly, offer a salty, tangy, and mildly sweet flavor simultaneously, making it utterly irresistible. This cucumber salad is vegan, plant-based, and gluten-free, making it suitable for a range of dietary preferences!
5 Star Reader Review
⭐⭐⭐⭐⭐ “This salad is fantastic! Ever since I found it, I’ve already made it twice!! I truly appreciated how the onions were sliced so thin that they didn’t overshadow the dish. My husband also enjoyed it!” -Anonymous
Ingredients You’ll Need
You only need a handful of ingredients to create this cucumber salad with vinegar (for specific amounts, see the recipe below):
Cucumbers: If possible, opt for English cucumbers. They boast a sweet taste, delicate skin, and virtually seedless structures. Standard cucumbers are also acceptable, but we suggest English cucumbers if available (sometimes referred to as Persian cucumbers).
White onion: The subtle flavor of white onion is essential for this recipe. Feel free to mix white onion with red onion as we do in our traditional cucumber salad.
Fresh dill: I’ve included fresh dill for an herby touch. However, it’s not mandatory: preparing the salad without it still results in a wonderful taste. You may also use dried dill if preferred.
White vinegar, sugar, and kosher salt: These elements come together to create a tangy brine for the salad.
How to Make Cucumber Salad with Vinegar
This cucumber salad with vinegar is remarkably simple to prepare: the only challenging part is being patient while it marinates in the fridge! The secret to perfecting this cucumber salad is to slice the onions and cucumbers as thinly as you can. Thinly slicing the cucumbers and onions allows the salt to extract most of the moisture, giving this salad an astonishingly delightful texture.
After marinating for 1 hour, you can enjoy your cucumber salad with vinegar any time within the next 7 days. The flavor continues to improve over time!
What to Serve with Vinegar Cucumber Salad
There are numerous ways to enhance this cucumber salad with vinegar! We typically enjoy it as a refreshing summer side dish, so naturally, it pairs well with meals abundant in summer vegetables. However, this salad can be enjoyed year-round. Here are some ideas to inspire you:
Summer Grill Night:
Easy Picnic Spread:
Storage
Keep refrigerated in a sealed container for up to 7 days. The liquid will collect: this is normal! Stir well before serving and use a slotted spoon.
Dietary Notes
This cucumber salad featuring vinegar is vegetarian, gluten-free, vegan, plant-based, and dairy-free.
Frequently Asked Questions
Can I prepare this salad in advance? Absolutely! The flavors will blend and develop over time, enhancing its taste.
How long will cucumber salad remain fresh in the refrigerator? Stored in an airtight container, cucumber salad can last for 7 days in the fridge. The cucumbers may soften slightly with time.
What type of vinegar is best for cucumber salad? White distilled vinegar is a traditional option. We recommend using it whenever possible.
Can I use a different type of cucumber? English cucumbers are optimal for their thin skin and fewer seeds, but regular cucumbers are fine too. Just peel them if the skin is thick or coated with wax.
Cucumber Salad with Vinegar
This cucumber salad featuring vinegar is a simple, wholesome side dish crafted from thinly cut cucumbers and onions in a zesty brine: prepared in just minutes and even more delicious the following day!
Author: Sonja Overhiser
Prep Time: 1 hour 10 minutes
Cook Time: 0 minutes
Total Time: 1 hour 10 minutes
Yield: 6 to 8
Category: Salad
Method: Raw
Cuisine: German
Ingredients
2 large, thin cucumbers (English if possible)
1 small yellow or white onion
2 tablespoons chopped fresh dill (optional)*
½ cup white vinegar
2 tablespoons granulated sugar
1 teaspoon kosher salt
Fresh ground black pepper
Instructions
Slice the cucumbers as thin as you can, using a mandolin if you wish. Peel and thinly slice the onion into half-moon shapes. Arrange the cucumbers and onions in a large shallow bowl; add the dill (if using). In a small bowl, combine the white vinegar, sugar, salt, and
Read More
How to Perfectly Grill Peppers and Onions
Alex & Sonja: The Culinary Pair Behind A Couple Cooks
Introducing Alex and Sonja Overhiser, the energetic pair who have transformed their love for cooking into a flourishing online community. As the authors of two celebrated cookbooks and the creators of the well-known website, A Couple Cooks, Alex and Sonja have been motivating home cooks since 2010 with their straightforward, seasonal recipes and infectious passion for the culinary arts.
Their adventure into the realm of food blogging started as a mutual pastime. As busy parents and a couple in real life, Alex and Sonja discovered joy in cooking together and aimed to share that experience with others. Their website, A Couple Cooks, swiftly evolved into a hub where they could present thousands of original recipes, cooking advice, and meal planning concepts, all thoughtfully crafted and photographed by the duo themselves.
What distinguishes Alex and Sonja is their dedication to crafting recipes that are not only tasty but also within reach for the everyday cook. Their emphasis on seasonal ingredients guarantees that their dishes are fresh and flavorful, while their clear instructions make them simple to follow. Whether you’re a beginner in the kitchen or an experienced chef, A Couple Cooks has something for everyone.
Besides their website, Alex and Sonja have penned two cookbooks that further highlight their culinary skills and inventiveness. These books reflect their commitment to helping others discover joy in cooking, with each recipe tested and approved by their own family, including their children.
Through A Couple Cooks, Alex and Sonja have cultivated a community of food enthusiasts who share their passion for cooking and enjoying good food. Their accessible style and genuine affection for their craft have made them cherished figures in the food blogging community, and their work continues to inspire numerous individuals to embrace the pleasure of cooking.
Read More
Easy and Fast Grilled Tofu Recipe
**Grilling Tofu: A Guide to Perfectly Grilled Tofu with Mediterranean Flavors**
Tofu is an adaptable and healthy plant-derived protein that can enhance any dish. When grilling tofu, selecting the appropriate kind is vital for optimal outcome. Soft or silken tofu should be avoided for grilling, as it does not possess the density required to withstand grilling. Instead, choose firm or extra-firm tofu, which will retain its shape and texture when exposed to high temperatures.
**Preparing Tofu for the Grill**
1. **Press the Tofu:** Start by pressing the tofu to eliminate excess moisture. This step is crucial for achieving a denser texture and enabling the tofu to soak up marinades more effectively. Place the tofu block between paper towels or a clean kitchen towel and place a heavy item on top, such as a cast-iron skillet or a stack of books. Allow it to sit for at least 30 minutes.
2. **Slice the Tofu:** After pressing, cut the tofu into uniform pieces. Thicker slices are preferred for grilling since they are less likely to break apart.
3. **Marinate the Tofu:** To impart flavor to the tofu, marinate it prior to grilling. For a Mediterranean-inspired twist, use this marinade:
– 6 tablespoons soy sauce
– ¼ cup olive oil
– 1 teaspoon garlic powder
– 1 teaspoon onion powder
– 1 teaspoon smoked paprika
Mix the ingredients in a bowl or a resealable plastic bag, add the tofu slices, and allow them to marinate for at least 30 minutes. For more pronounced flavor, marinate for several hours or overnight in the fridge.
**Grilling Tofu**
1. **Preheat the Grill:** Heat your grill to medium-high. Ensure that the grates are clean and lightly greased to avoid sticking.
2. **Grill the Tofu:** Position the marinated tofu slices on the grill. Cook them for about 4-5 minutes on each side, or until grill marks form and the tofu is heated throughout. Minimize movement of the tofu to prevent it from crumbling.
3. **Serve and Enjoy:** After grilling, take the tofu off the grill and serve it warm. Grilled tofu can be enjoyed on its own, added to salads, or paired with a side of grilled vegetables for a complete meal.
**Conclusion**
Grilling tofu is a straightforward yet fulfilling process that can enhance your plant-based meals. By selecting the right tofu and utilizing a flavorful marinade, such as the Mediterranean-style version, you can craft a scrumptious and gratifying dish. Remember to press the tofu, marinate it adequately, and grill it to perfection for the best results. Savor the smoky, savory notes of grilled tofu as a delightful complement to your cooking repertoire.
Read More
Tacos with Filling of Grilled Shrimp
Alex & Sonja: The Culinary Pair Behind A Couple Cooks
Introducing Alex and Sonja Overhiser, the spirited pair who have turned their love for cooking into a flourishing online community. As the creators of two celebrated cookbooks and the founders of the well-known website A Couple Cooks, Alex and Sonja have been motivating home cooks since 2010 with their straightforward, seasonal recipes and contagious passion for the culinary arts.
Residing in Indianapolis, Indiana, Alex and Sonja are not just collaborators in the kitchen but also in their personal lives. Their adventure commenced with a mutual appreciation for food and a goal to prepare wholesome, delightful meals that unite people. Throughout the years, they have sharpened their abilities and cultivated a distinctive cooking style that highlights fresh ingredients, lively flavors, and approachable techniques.
A Couple Cooks emerged from a wish to record and share their culinary escapades. What originated as a modest blog has evolved into a thorough resource for food lovers globally. The website now features thousands of original recipes, all carefully developed and photographed by Alex and Sonja themselves. From hearty breakfasts to sophisticated dinners, their recipes accommodate a diverse array of tastes and dietary requirements.
Alongside recipes, A Couple Cooks provides useful cooking advice and meal planning suggestions, making it simpler for busy families to enjoy homemade meals. As parents, Alex and Sonja are aware of the difficulties in balancing work, family, and healthy nutrition. Their practical suggestions and child-tested recipes aim to streamline meal preparation and promote family cooking and dining together.
The couple’s cookbooks further highlight their culinary knowledge and inventiveness. Each book serves as proof of their dedication to making cooking approachable and enjoyable for all. With breathtaking photography and clear directions, their cookbooks are essential for anyone aspiring to enhance their home cooking.
Alex and Sonja’s influence goes beyond their website and publications. They are active on social media, where they interact with their followers, share cooking insights, and offer snapshots of their everyday lives. Their warm and inviting personality has made them beloved by fans worldwide, fostering a nurturing community of like-minded food enthusiasts.
Through A Couple Cooks, Alex and Sonja Overhiser persist in inspiring and empowering home cooks to relish the pleasure of cooking. Their commitment to quality, simplicity, and family-friendly meals has rendered them cherished icons in the culinary realm, with their impact showing no signs of waning.
Read More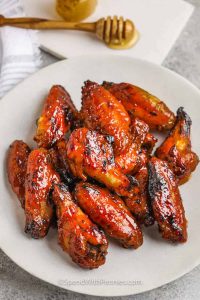
Fast and Simple Sticky BBQ Wings Prepared in 30 Minutes
# Honey BBQ Wings: Sweet, Sticky, and Air-Fried Perfection
These Honey BBQ Wings present a delightful mix of sweet, smoky, and sticky tastes, making them an ideal appetizer or snack. The air fryer guarantees that the wings emerge with crispy edges and a shiny honey barbecue sauce in each mouthful, and they are also simpler to make and clean up than classic frying techniques.
## Flavor Profile
– **Flavor**: Sweet, smoky, and sticky accompanied by a tangy barbecue sauce and a shiny honey glaze.
– **Why Make It**: The brief ingredient list and the practicality of the air fryer make these wings straightforward to prepare while still offering a rich, caramelized flavor without deep frying.
## Recommended Tools
To create these wings, you will require:
– Air fryer
– Large bowl
– Tongs
– Small bowl for mixing the sauce
## Serving Suggestions
Present the Honey BBQ Wings with ranch or blue cheese dressing for dipping, and complement them with crunchy celery or coleslaw to offset the sweetness of the sauce.
## Ingredient Notes
– **Wings**: For optimal results, utilize split chicken wings or cut whole wings at the joints for uniform cooking.
– **Sauce**: Honey gives the sticky finish, while barbecue sauce contributes the smoky and tangy flavor. Pick a barbecue sauce that you like, as it will affect the final taste.
– **Variations**:
– Opt for a smoky barbecue sauce for a more robust flavor.
– Incorporate sriracha or replace honey with hot honey for a spicy twist.
– For larger events, think about an oven-baked version to serve a crowd.
## How to Make Honey BBQ Wings
1. **Preheat the Air Fryer**: Adjust the air fryer to 400°F.
2. **Season the Wings**: Coat the chicken wings with olive oil, salt, and pepper. Place them in a single layer in the air fryer basket and cook for 15 minutes.
3. **Prepare the Sauce**: While the wings are cooking, combine honey and barbecue sauce in a small bowl.
4. **Sauce the Wings**: After 15 minutes, take the wings out of the air fryer and mix them with the sauce. For hassle-free cleanup, line the air fryer basket with parchment paper before adding the sauced wings.
5. **Final Cooking**: Put the wings back in the air fryer and cook for an extra 5 to 7 minutes until they are sticky and caramelized.
6. **Rest Before Serving**: Allow the wings to rest for a few minutes before serving, as the sauce will be extremely hot.
### Tips for Perfect Wings
– **For Crispy Wings**: Dry the wings with a paper towel before seasoning to make sure they crisp up instead of steaming.
– **Perfect Sauce Application**: Introduce the sauce towards the end of cooking to avoid the honey from burning.
– **Re-Crisp**: If you have several batches, combine them for a few minutes in the air fryer before serving to ensure they are all hot.
– **Use Parchment**: Line the air fryer with parchment after saucing for simpler cleanup, but refrain from preheating with loose parchment inside.
## Storing Leftovers
Store any leftovers in an airtight container in the refrigerator for up to 4 days, or freeze them for as long as 2 months. To reheat, thaw in the refrigerator and warm in the air fryer at 375°F to 400°F for a few minutes to restore the crispy texture.
## Nutritional Information (per serving)
– **Calories**: 398
– **Carbohydrates**: 25g
– **Protein**: 23g
– **Fat**: 23g
– **Sodium**: 274mg
These Honey BBQ Wings are destined to be a success at your next gathering, providing a deliciously sticky and flavorful experience without the difficulties of deep frying. Savor every bite!
Read More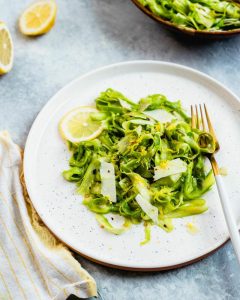
Asparagus Salad with Thinly Sliced Asparagus
Alex & Sonja: The Culinary Partners Behind A Couple Cooks
Introducing Alex and Sonja Overhiser, the energetic pair behind the esteemed culinary platform, A Couple Cooks. As the authors of two bestselling cookbooks, busy parents, and a couple who shares a love for cooking, Alex and Sonja have made a notable mark in the realm of home cooking. Their adventure started in 2010 when they established A Couple Cooks to convey their enthusiasm for straightforward, seasonal recipes and the joy that cooking can add to everyday life.
Throughout the years, A Couple Cooks has evolved into a thorough resource for home cooks, presenting thousands of unique recipes, culinary tips, and meal planning suggestions. Each recipe is carefully developed and photographed by Alex and Sonja, ensuring that every dish is not just delectable but also visually delightful. Their recipes are trialed with their family, including their children, to guarantee they are both kid-friendly and satisfying for adults.
What distinguishes Alex and Sonja is their dedication to crafting recipes that are approachable for cooks of all expertise levels. They concentrate on utilizing seasonal ingredients to create dishes that are both tasty and wholesome. Their cooking philosophy champions simplicity and sustainability, motivating home cooks to adopt fresh, nutritious ingredients.
In addition to their site, Alex and Sonja have written two cookbooks that delve further into their culinary ideals. These volumes provide readers with an in-depth look at their cherished recipes and cooking methods, offering inspiration for crafting unforgettable meals at home.
Apart from recipes, A Couple Cooks provides useful cooking tips and meal planning concepts to assist busy families in optimizing their kitchen time. Alex and Sonja acknowledge the difficulties of balancing work, family, and cooking, and they work to make meal preparation an enjoyable and fulfilling endeavor for all.
Through their website, cookbooks, and personal journeys, Alex and Sonja Overhiser keep inspiring home cooks globally to relish the delights of cooking. Their commitment to sharing uncomplicated, seasonal recipes and practical culinary advice has turned A Couple Cooks into a cherished resource for anyone aspiring to elevate their cooking skills and savor delightful, home-cooked meals.
Read More
Non-Alcoholic Paloma Drink
Alex & Sonja: The Culinary Team Behind A Couple Cooks
Introducing Alex and Sonja Overhiser, the energetic pair behind the beloved culinary site, A Couple Cooks. This real-life pair has transformed their love for cooking into a flourishing platform that motivates thousands of home chefs globally. As authors of two acclaimed cookbooks, busy parents, and passionate food enthusiasts, Alex and Sonja have perfected the balance of family life with their mutual affection for crafting delightful, easy, and seasonal dishes.
The adventure of A Couple Cooks commenced in 2010 when Alex and Sonja opted to share their culinary escapades with the broader audience. What began as a modest blog has evolved into a thorough resource for those aiming to elevate their cooking abilities and relish the art of preparing meals from scratch. Their site now features thousands of original recipes, all carefully created and photographed by the couple personally. Each recipe is tested not only by Alex and Sonja but also by their kids, making sure that the dishes are family-friendly and accessible.
A defining feature of A Couple Cooks is its focus on simplicity and seasonality. Alex and Sonja hold the belief that cooking should be a pleasurable and hassle-free experience, which is why they concentrate on developing recipes that are straightforward and utilize easily found ingredients. Their meals highlight the tastes of each season, inspiring home cooks to take full advantage of fresh, local produce.
Alongside recipes, A Couple Cooks provides a treasure trove of cooking advice and meal planning suggestions. Whether you’re a beginner in the kitchen or an experienced cook, Alex and Sonja share valuable tips that can aid in streamlining your cooking routine and enhancing meal preparation efficiency. Their practical guidance encompasses everything from kitchen organization to time-saving methods, making it simpler for busy individuals and families to savor home-prepared meals.
Alex and Sonja’s cookbooks further elaborate on their culinary principles, presenting readers with a selection of their favorite recipes accompanied by beautiful photography and personal stories. These works stand as a demonstration of their dedication to making cooking accessible and enjoyable for everyone.
Through A Couple Cooks, Alex and Sonja Overhiser have cultivated a lively community of food enthusiasts who share their enthusiasm for great food and joyful cooking. Their commitment to delivering high-quality content and nurturing a love for cooking continues to motivate countless individuals to delve into the culinary realm and appreciate the simple joys of a home-cooked meal.
Read More
Forget the Jarred Stuff: This âIncredibly Creamyâ Spread Makes the Best 1-Ingredient Pasta Sauce
Itâs also amazing in scrambled eggs.
READ MORE…